Skip to product information


Sale price
€57,02
Regular price
€114,04
4W Solar Panel 3 In1 DC Output 12V Solar Cells Charger Built-in 18650 Battery For Outdoor security Camera IP66 Waterproof
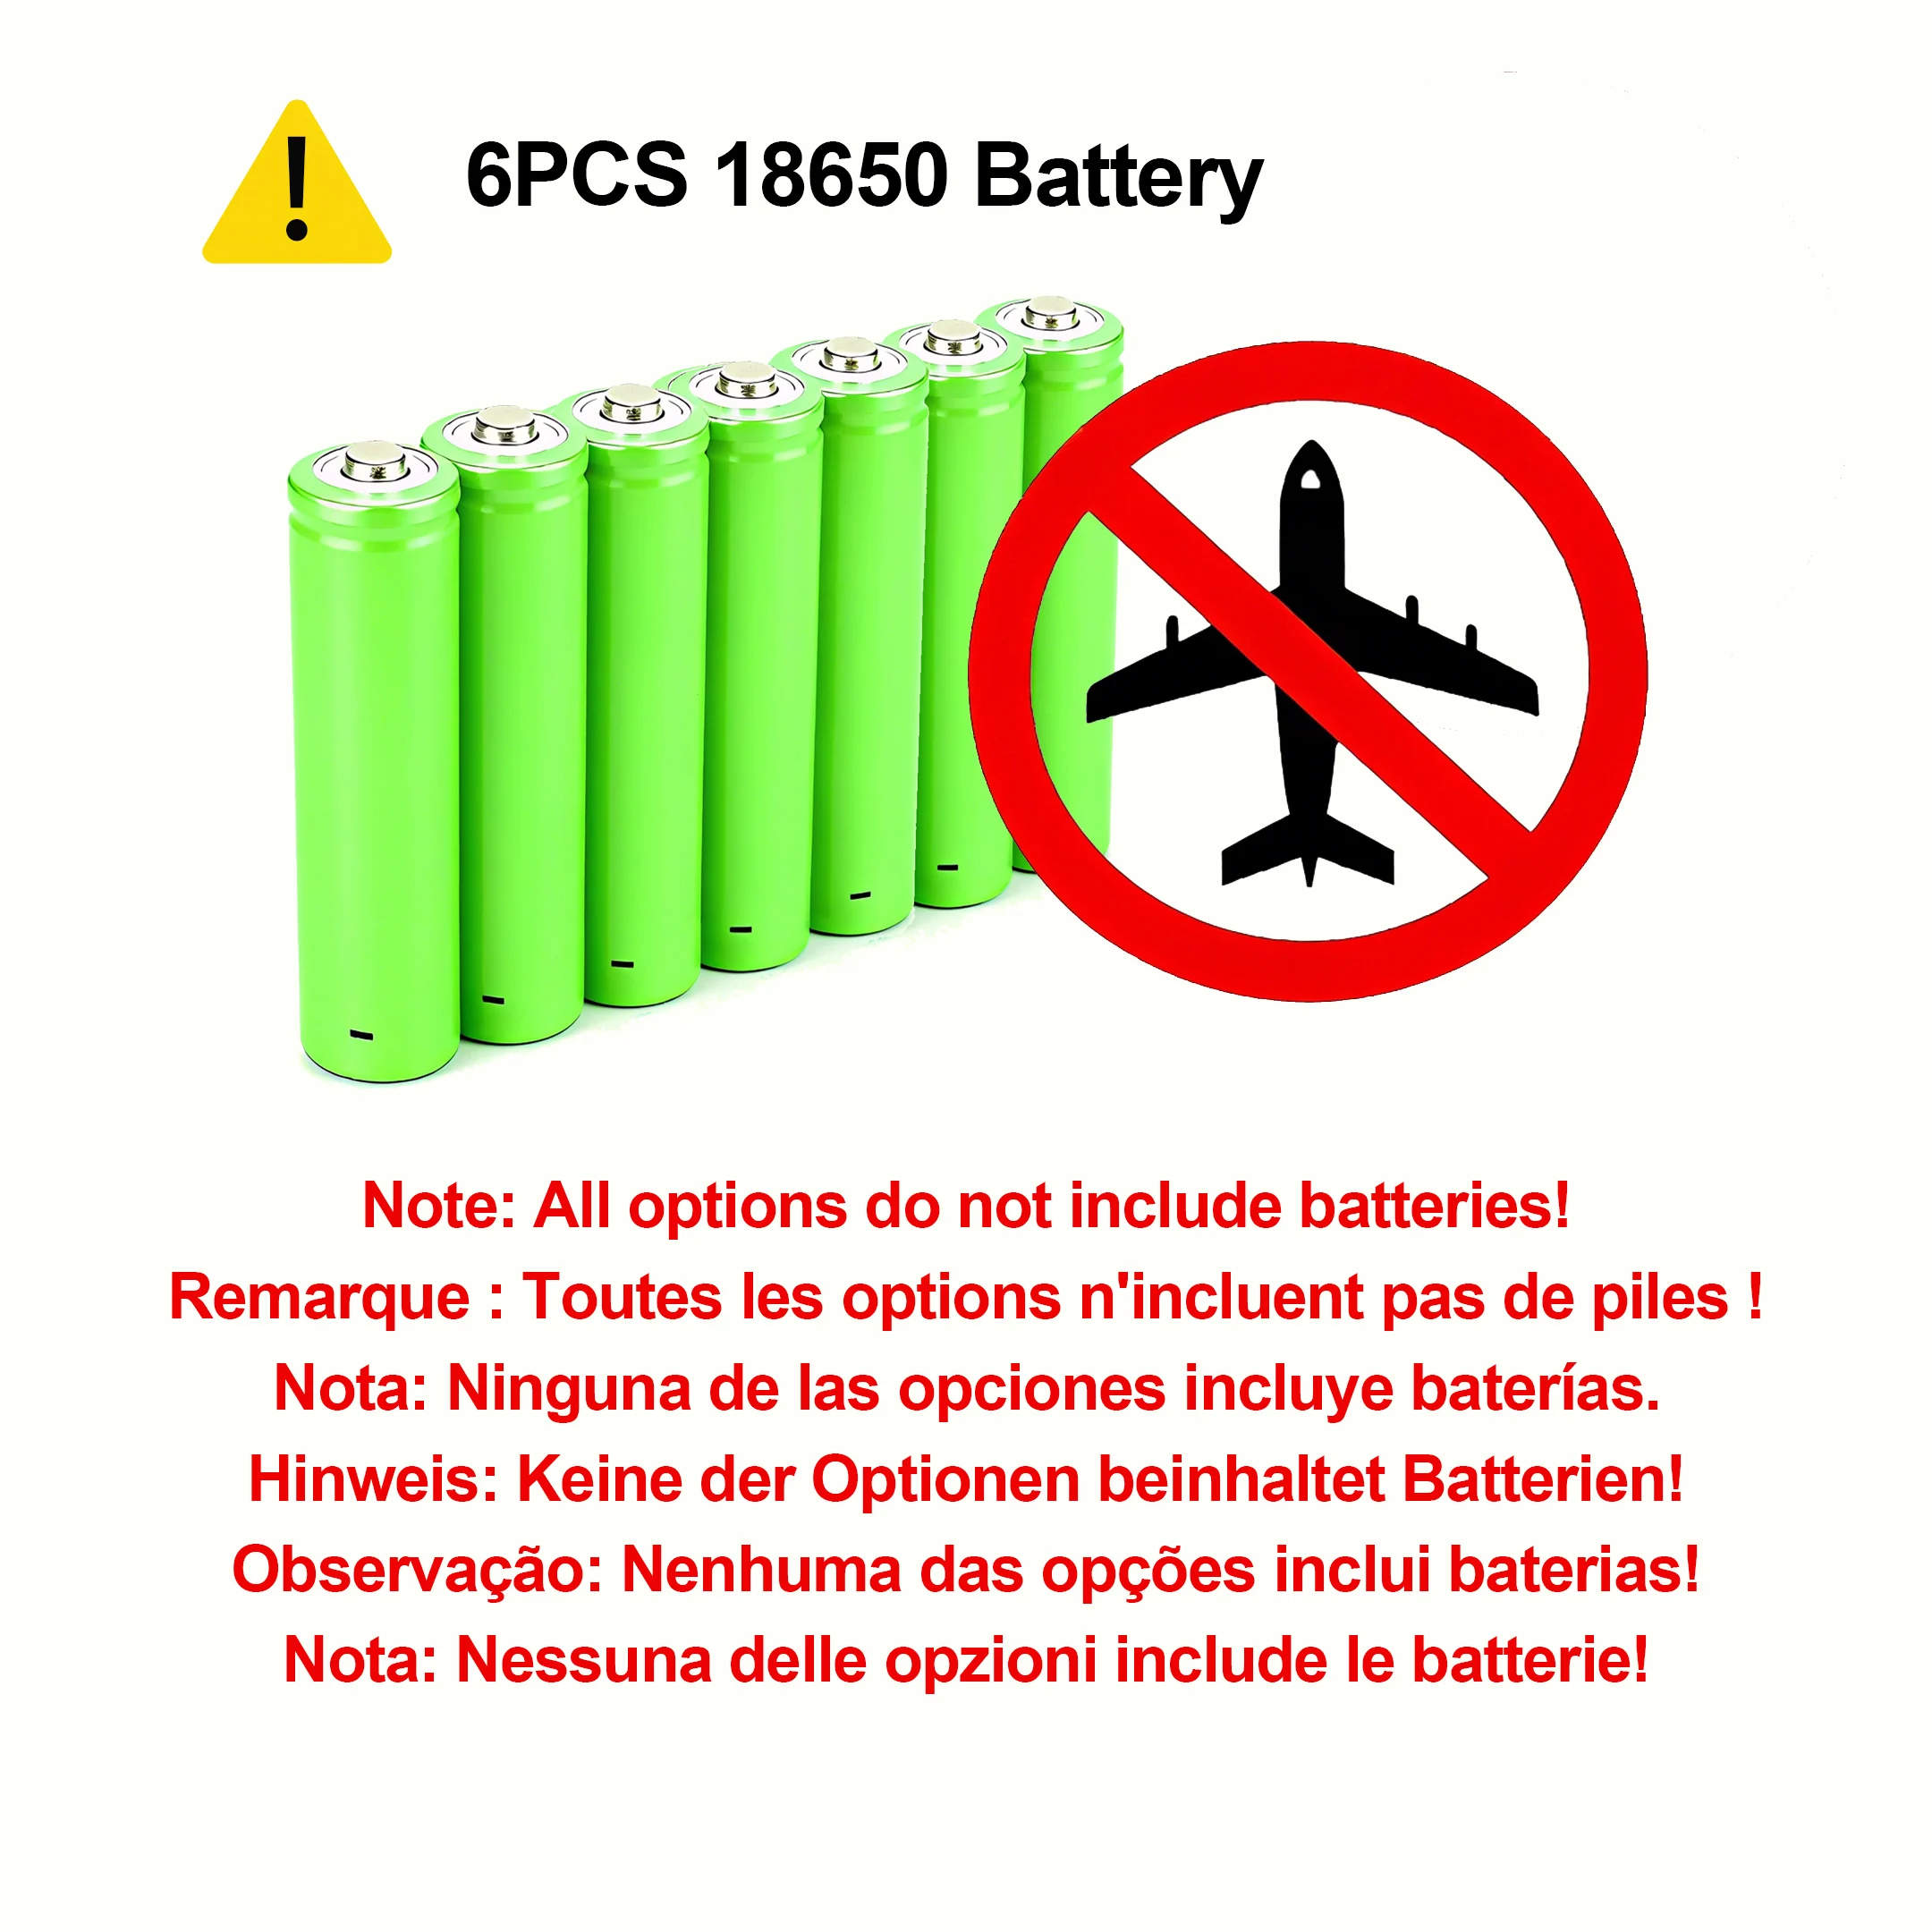
All options do not include batteries.
Output Power Test Video
The maximum power peak is around 10W for continuous operation. It is recommended not to exceed 6-8W during operation.
Output Current
Option 1: Output 5V
Option 2: Output 3.7V-4.2V(Battery voltage)
Option 3: Output 6V
Option 4: Output 9V
Option 5: Output 12V
Batteries not included!!!If you can't buy 18650 batteries, do not purchase this product! Do not purchase it!!!
Main Features:
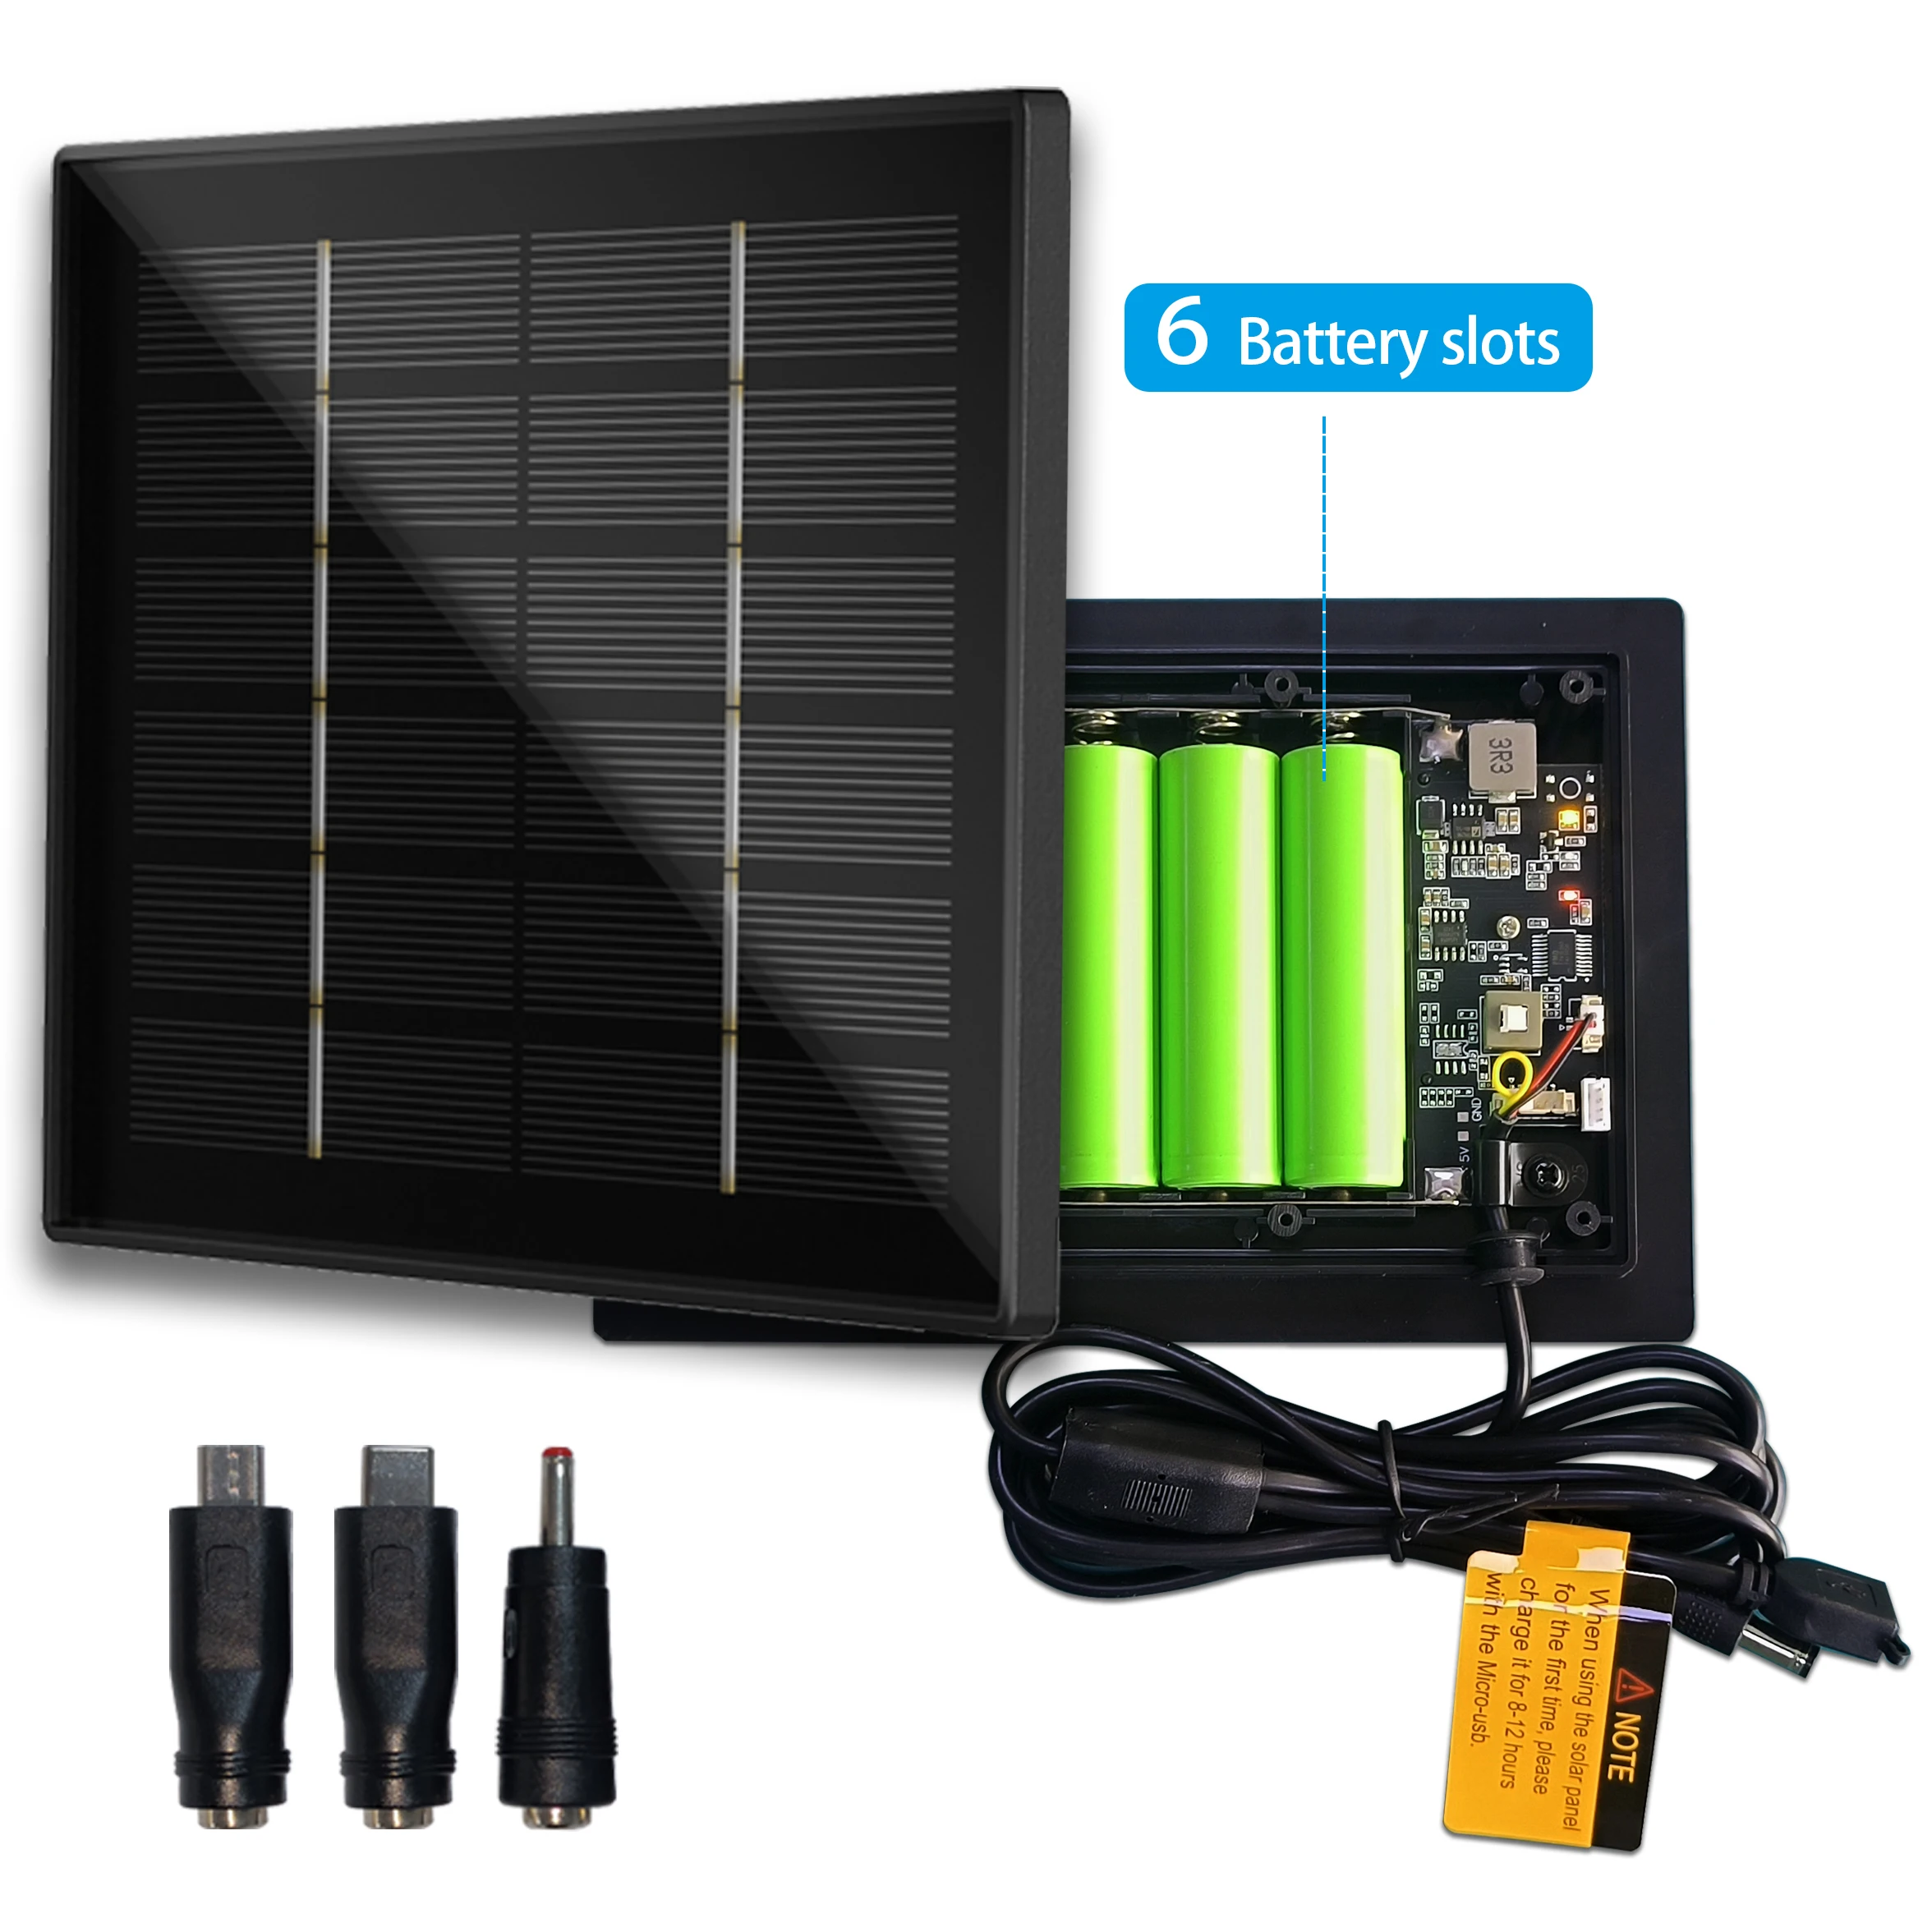
【Replaceable Batteries】The solar panel is equipped with 6 built-in 18650 battery slots, with slot dimensions compliant with international 18650 battery specifications, allowing for easy battery installation.
【MCU Charging Management】Utilizes a low-power MCU core processor to precisely manage charging and discharging processes, ensuring the solar panel operates normally.
【Monocrystalline Silicon Solar Cells】The solar cells are made of monocrystalline silicon material, achieving a conversion efficiency of up to 23%, thereby enhancing the efficiency of converting sunlight into electricity.
【Constant Current Voltage Regulation Circuit PCB】The built-in PCBA uses a constant current circuit to output a stable voltage from the battery, powering your devices and ensuring their normal operation.
【Charging Methods】This panel supports two charging methods: 1) solar charging, and 2) charging the battery using a 5V2A power adapter.
【Status Indicator Lights】The panel features three status indicator lights on the back, making it easy to monitor the panel's operational status and troubleshoot issues.
【Outdoor Waterproof IP66】This panel is specifically designed for outdoor use and features IP66-rated waterproof performance.
【Overcharge and Over-Discharge Protection】The overcharge voltage is 4.25V, and the over-discharge voltage is 2.8V, providing safer protection for the battery and extending its lifespan.
【Short-Circuit Protection】The panel is equipped with short-circuit protection functionality. If you accidentally reverse the polarity of the output voltage, it will not damage the internal circuitry of the panel.
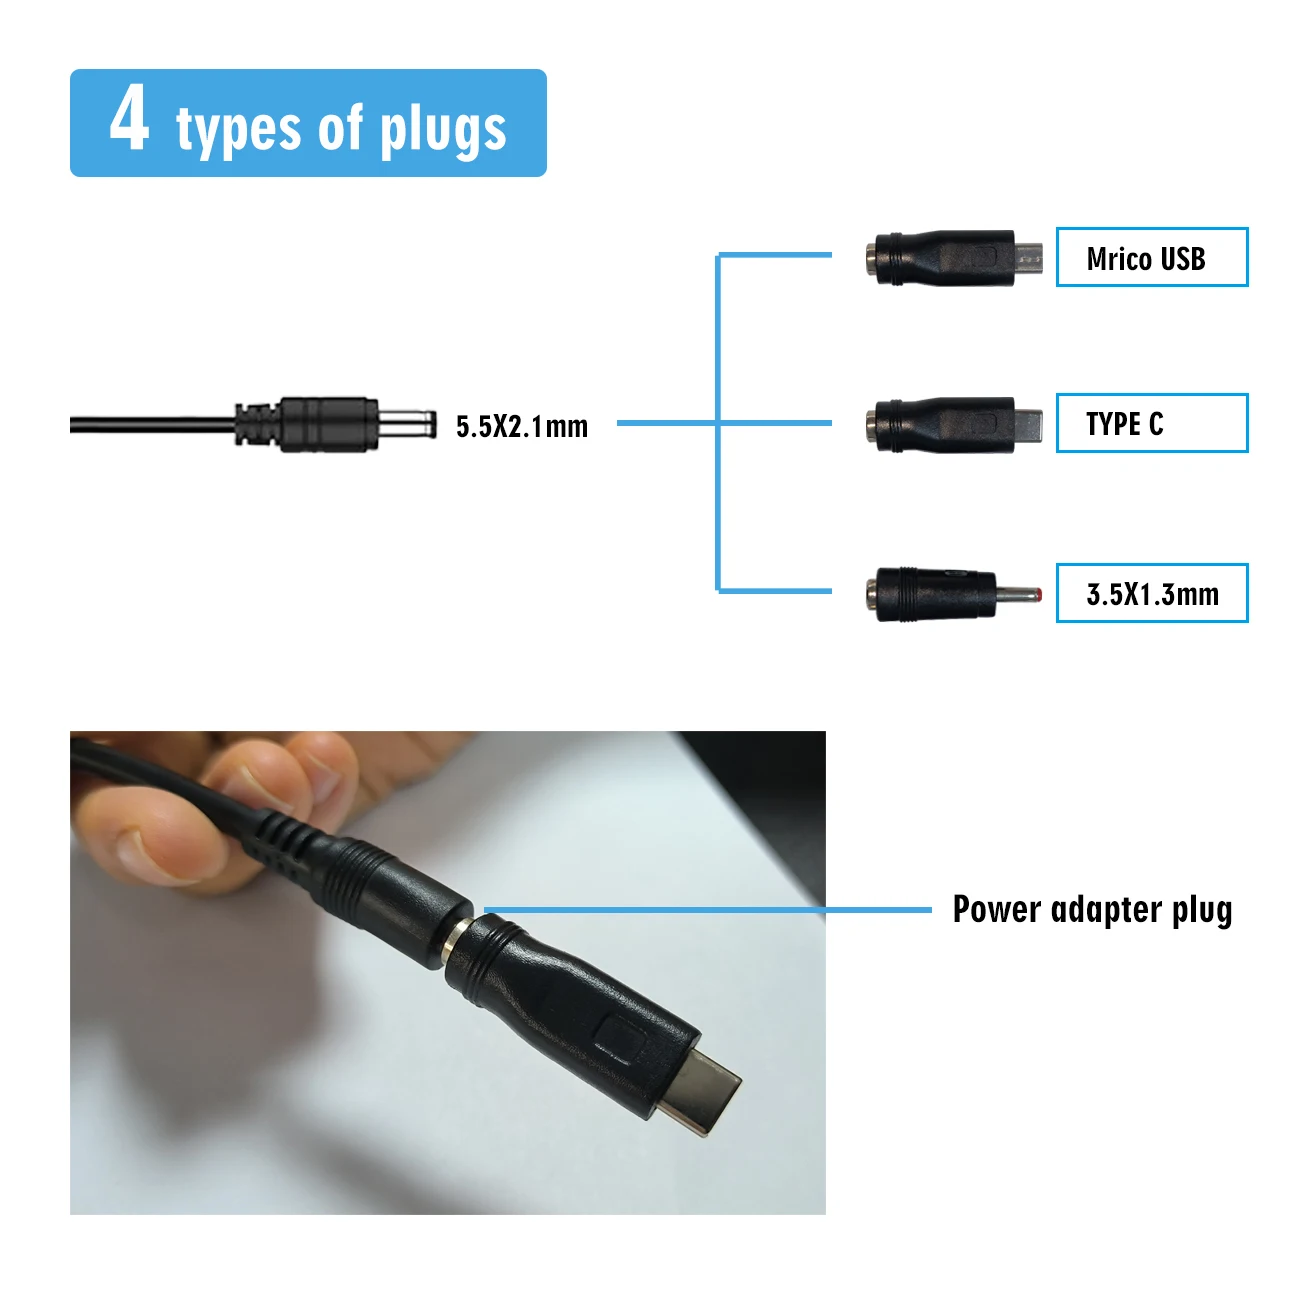
【About the Cable】The cable is 2 meters long and features one 5V-6V input interface and one output interface with a 5.5x2.1mm DC plug. It includes a Micro USB plug, Type-C plug, and 3.5x1.35mm plug, along with a USB cable.
【Switch Button】The switch button connects the battery to the circuit PCB, providing high safety redundancy.
FAQ
Q: Is the battery included?
A: Panel has 6 battery slots, you can choose you need.
Q: Use environment temperature
A:-10°-50°
Q:How to choose a battery?
A:Supports all 18650 batteries.
Q:Is there a requirement for battery capacity?
A:No limitations, high capacity, long charging time.
Q:How are the panels installed?
A:Please install the panel in a location with greater than 5 hours/day of sunlight.
Free Software Version
Version 1: Night-OUTPUT&DAY-OFF(Suitable for LED lighting and equipment that needs to be turned on at night.)
Version 2: Night-OFF&DAY-OUTPUT(Suitable for some sensors that need to work during the day.)
The above two versions of customized software can be provided for free. If you need one of these modes, please leave us a message.
Note: The default delivered version is the one that outputs voltage continuously once powered on.
Device Power
Since the panel generates relatively little power, if it provides power for high-power devices, the rate at which the devices consume power is much greater than the rate at which the panel is charged.
If you need to work 7X24 hours, please keep your device power and working current less than the following reference values.
Device: power 0.45W
Working State 3
When the power consumption of your device is less than the power generated by the solar panel, the electricity charged by the panel every day is completely sufficient for the device's consumption. The battery power will remain stable, enabling 7x24-hour operation.
Working State 4
When the power consumption of your device is greater than the power generated by the solar panel, the battery power will gradually decrease until it reaches around 10% (3.4-3.5V), at which point the output will stop. At this time, the solar panel will wait for the battery to be charged, which may take 14-16 hours. Once the battery is recharged to 90% (4V), the solar panel will automatically resume output.
Many customers in this situation report that the device is not outputting power and is malfunctioning. Please do not panic. Wait for it to charge, and it will turn on automatically. At this point, patience is required. If charging in sunlight, it will take approximately 15 hours.
Working State 5
When the battery power is already low and you restart the solar panel, it will default to outputting power. However, because the battery itself does not have enough power, the MCU will detect the low battery level and stop the power output again. In this case, you need to wait for the solar energy to charge the battery. When the battery level reaches 90% (4V) again, the system will automatically turn on the output once more.
Applicable Devices
This solar panel can power hunting cameras, low-power cameras for up to 365 days. It can also charge cell phones, outdoor small power products.
The panel can accommodate up to 6 batteries. This link does not include batteries.
Batteries not included!!!If you can't buy 18650 batteries, do not purchase this product! Do not purchase it!!!
Multiple plugs
Four types of plugs are available: 5.5x2.1mm plug, Micro USB plug, Type-C plug, and 3.5x1.35mm plug. The cable comes standard with a 5.5x2.1mm plug. The plug can be replaced.
LED
Red light:
On: The battery voltage is normal (above 2V)
Off: The battery is abnormal.
Green light
Flashing green light: Charging in progress (battery voltage between 3.4-4.0V)
Green light off and red light on: Not charging.
Green light off and red light off: Low voltage charging in progress, with battery voltage nearly 0V. The light will automatically start flashing when the voltage reaches above 3.5V again.
Green light off and red light dim: Low-voltage charging in progress, with battery voltage below 2V. The light will automatically start flashing when the voltage reaches above 3.5V again.
Green light steady on: Battery charge at 90%, with voltage above 4.0V.
Orange light
On: there is output voltage
Off: No output voltage
Charging method
Two charging methods are available:
1. Solar panel charging: simply place it in direct sunlight to charge.
2. A Type-C interface is provided, along with a cable, allowing you to connect to
Material
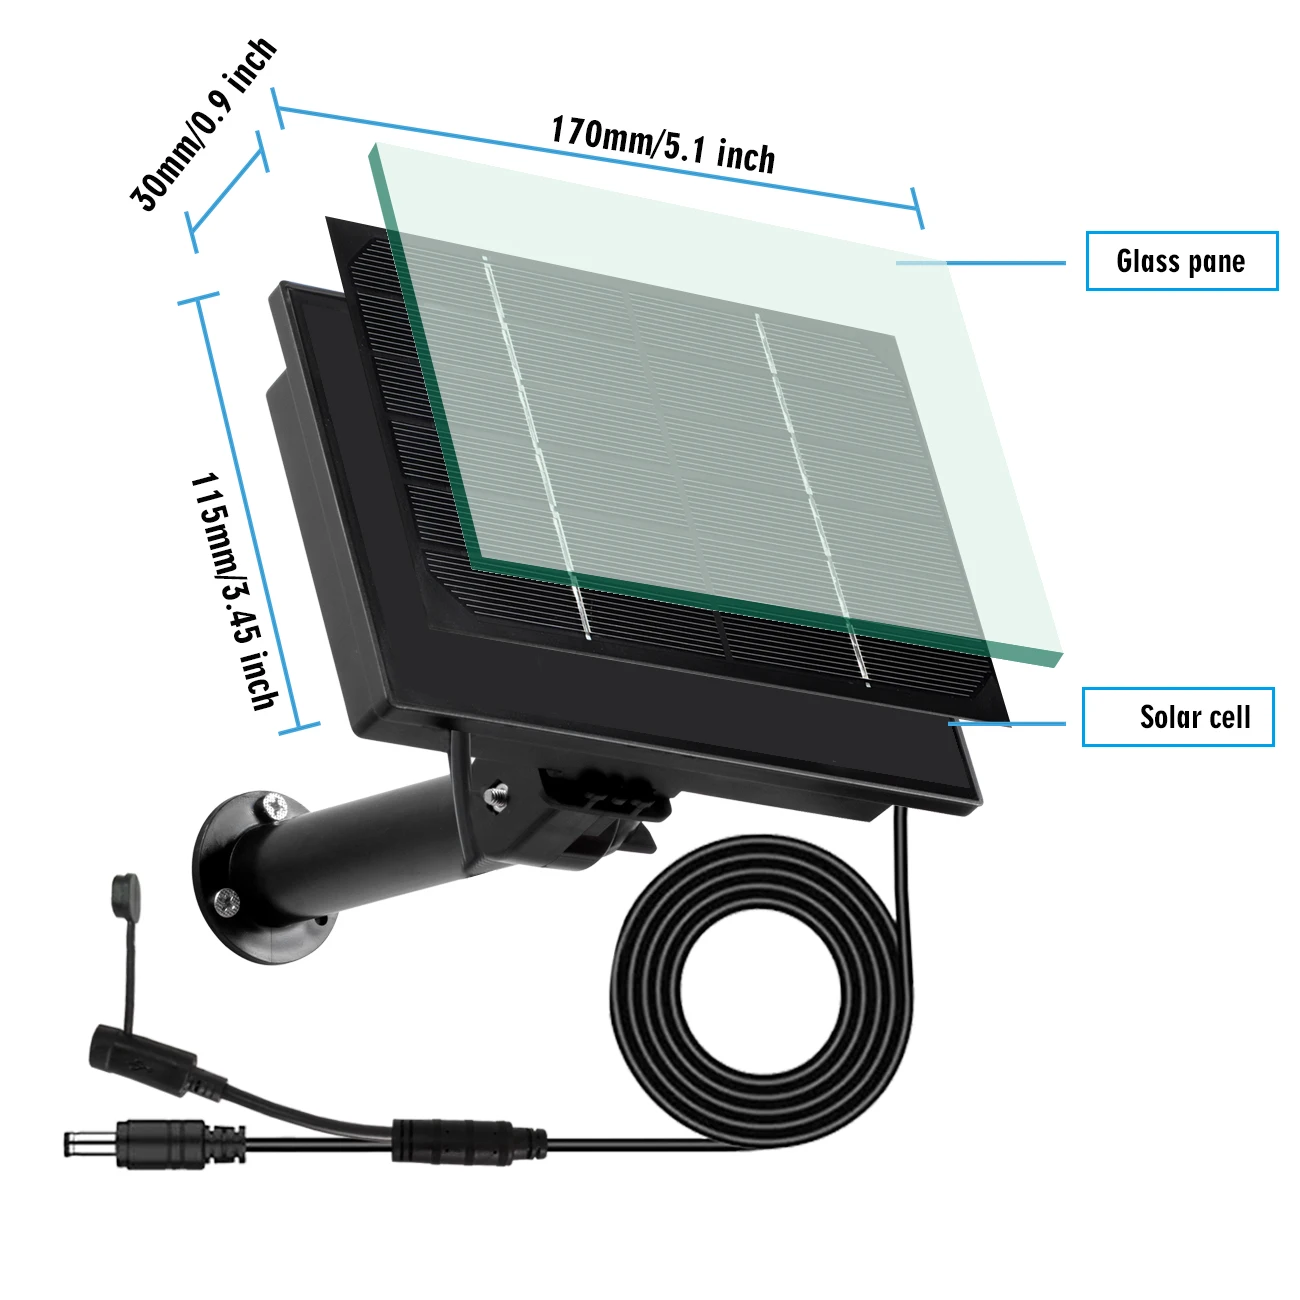
Glass panels have a longer service life and are less susceptible to corrosion. Glass > ETFE > PET materials. PET materials will corrode after more than one year of use. ETFE is uneven and prone to dust accumulation, which severely affects conversion efficiency.
The solar cells use monocrystalline silicon, which offers better conversion efficiency.
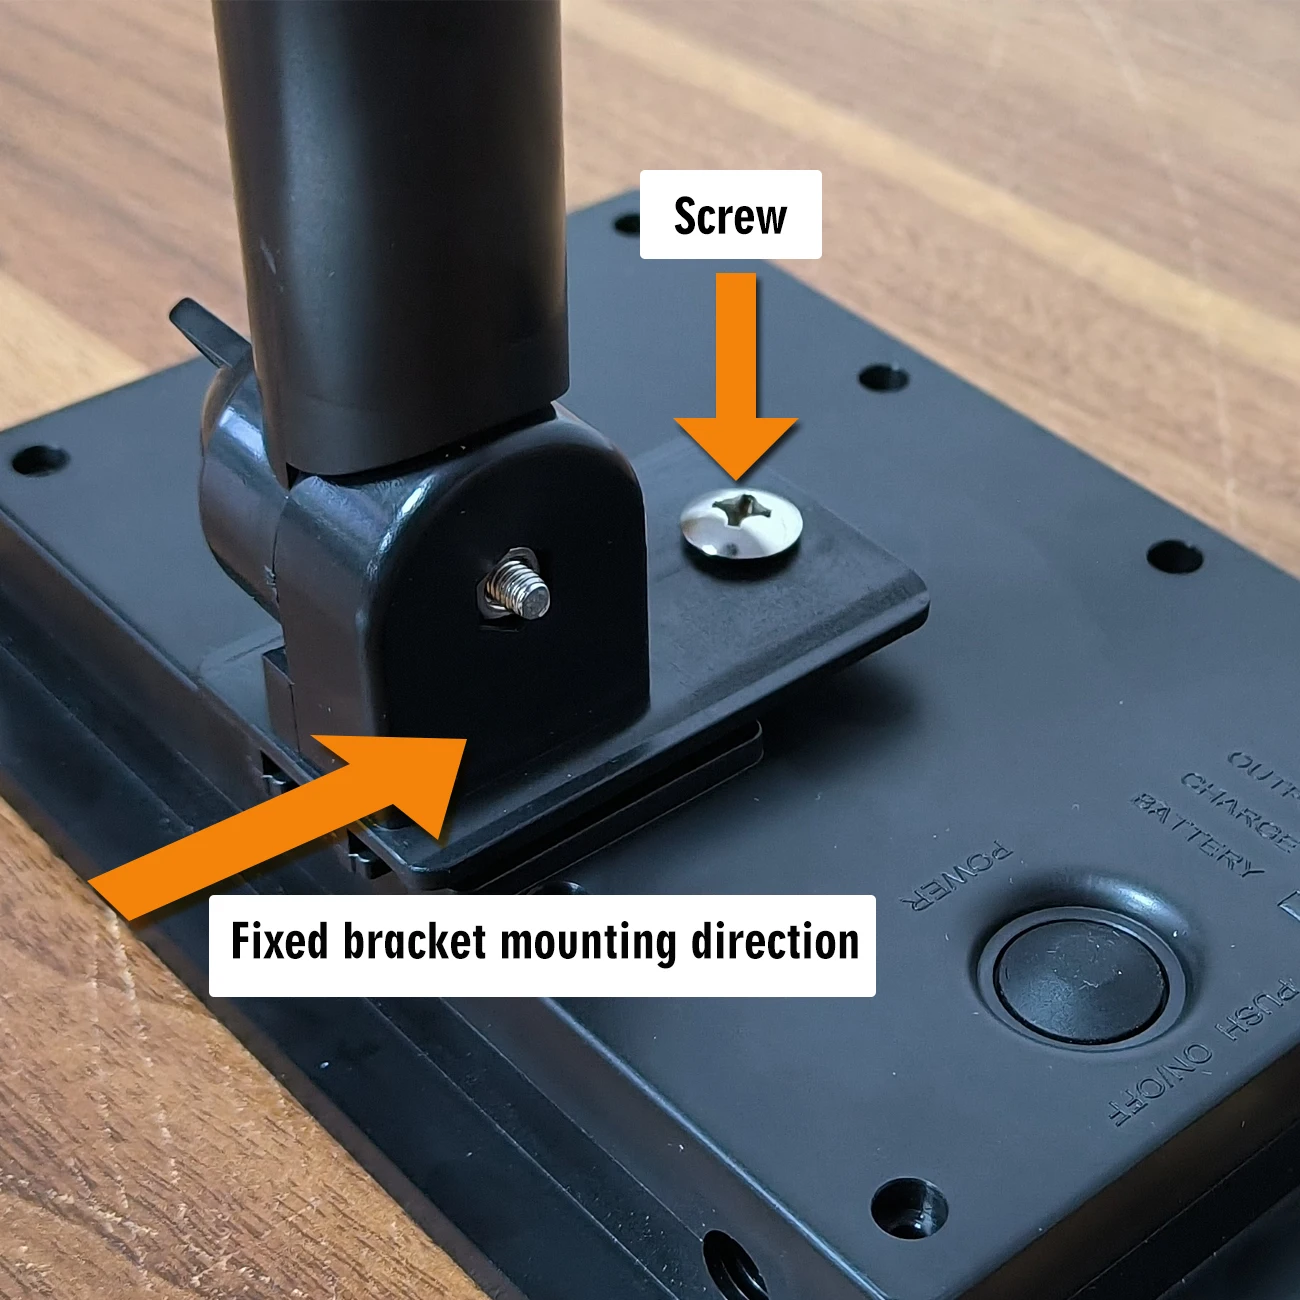
Easy installation
When fixing the bracket, adjust the mounting angle as required.
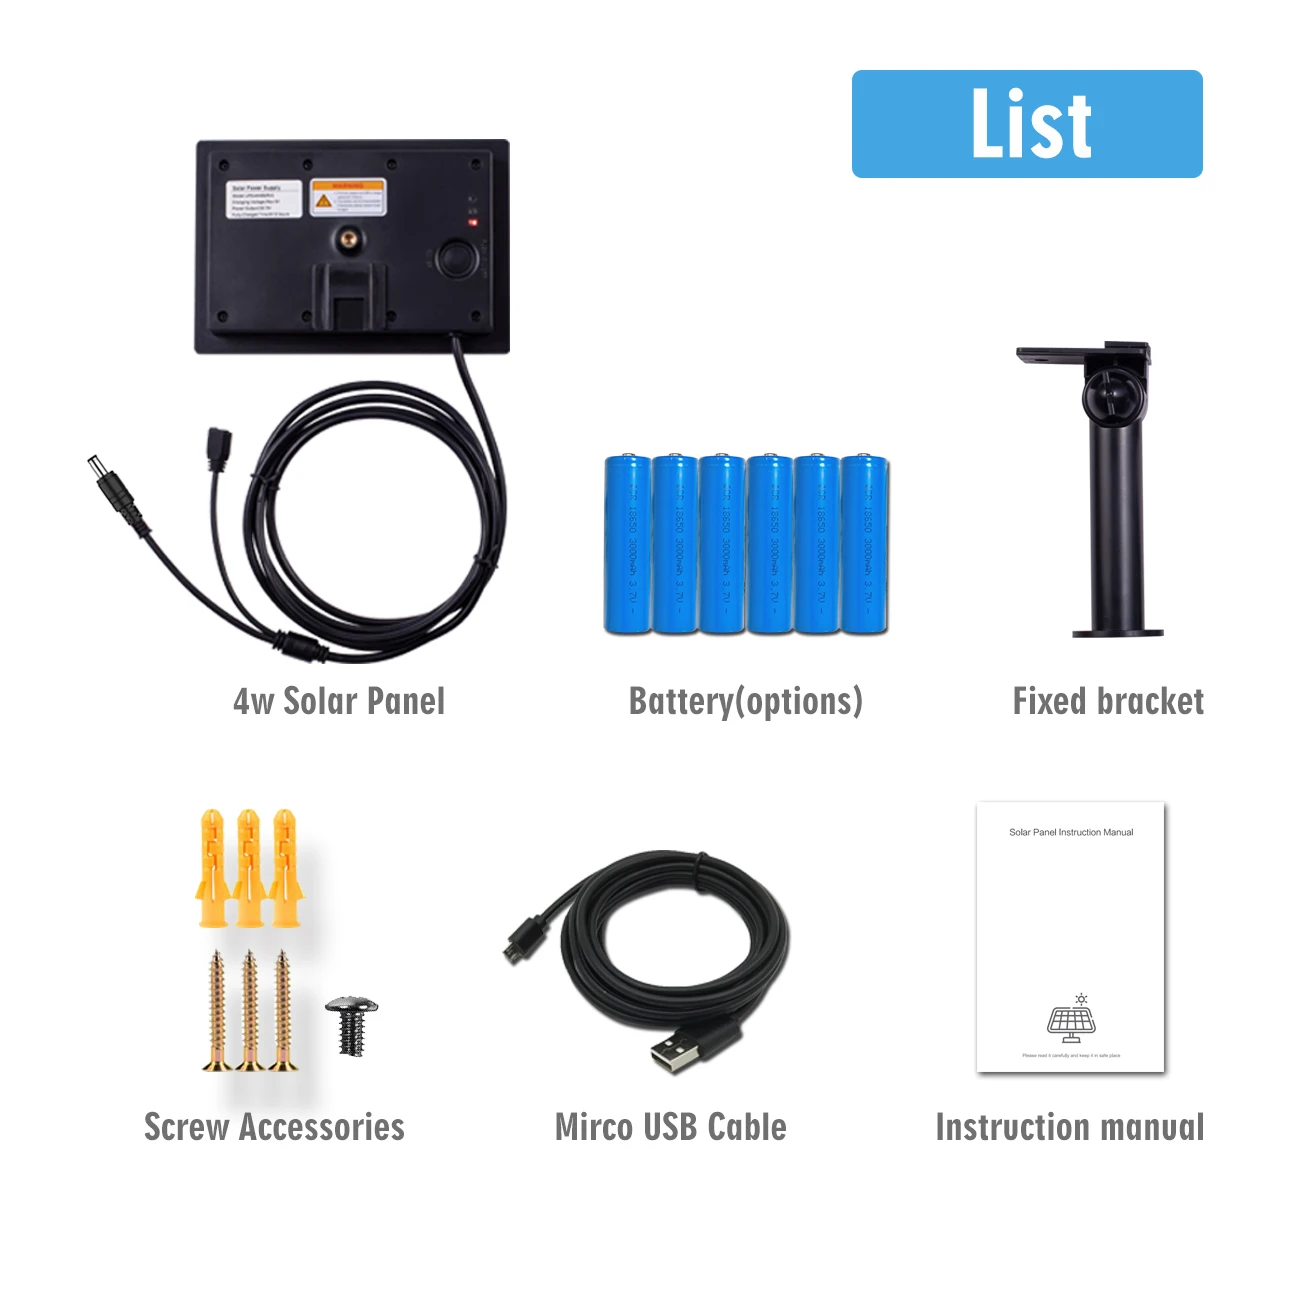
Packing List
Solar Panel 1PCS
Fixed bracket 1PCS
Screws 1PCS
Instruction manual 1PCS
Screw accessory package 1 package
Battery needs to be purchased by yourself
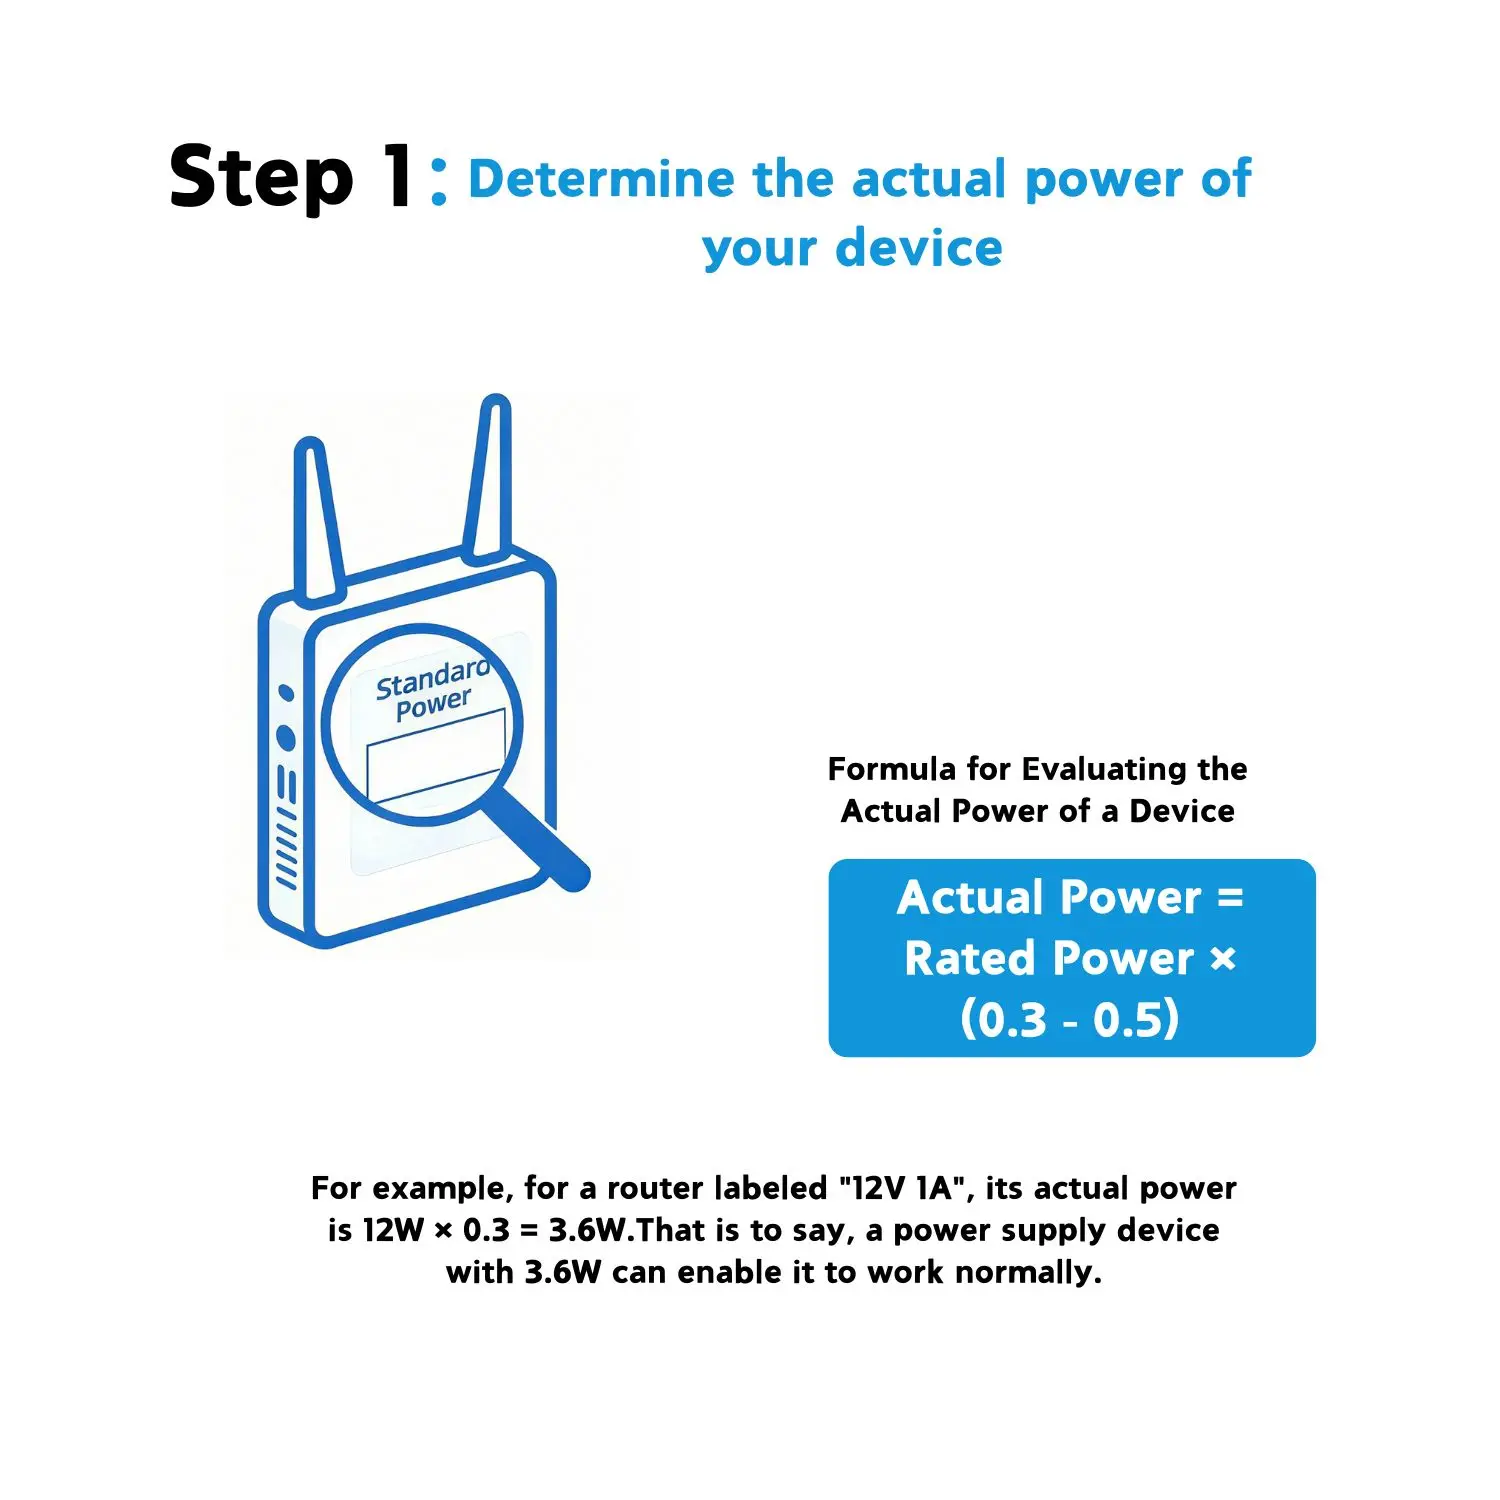
Step 1: Obtain the Actual Power of the Device
Actual Power = Rated Power on the Label × 0.3 - 0.5
For example, a router labeled "12V 1A" has a rated power of 12W. Its actual power is 12W × 0.3 = 3.6W, meaning it can operate with a 3.6W power supply.
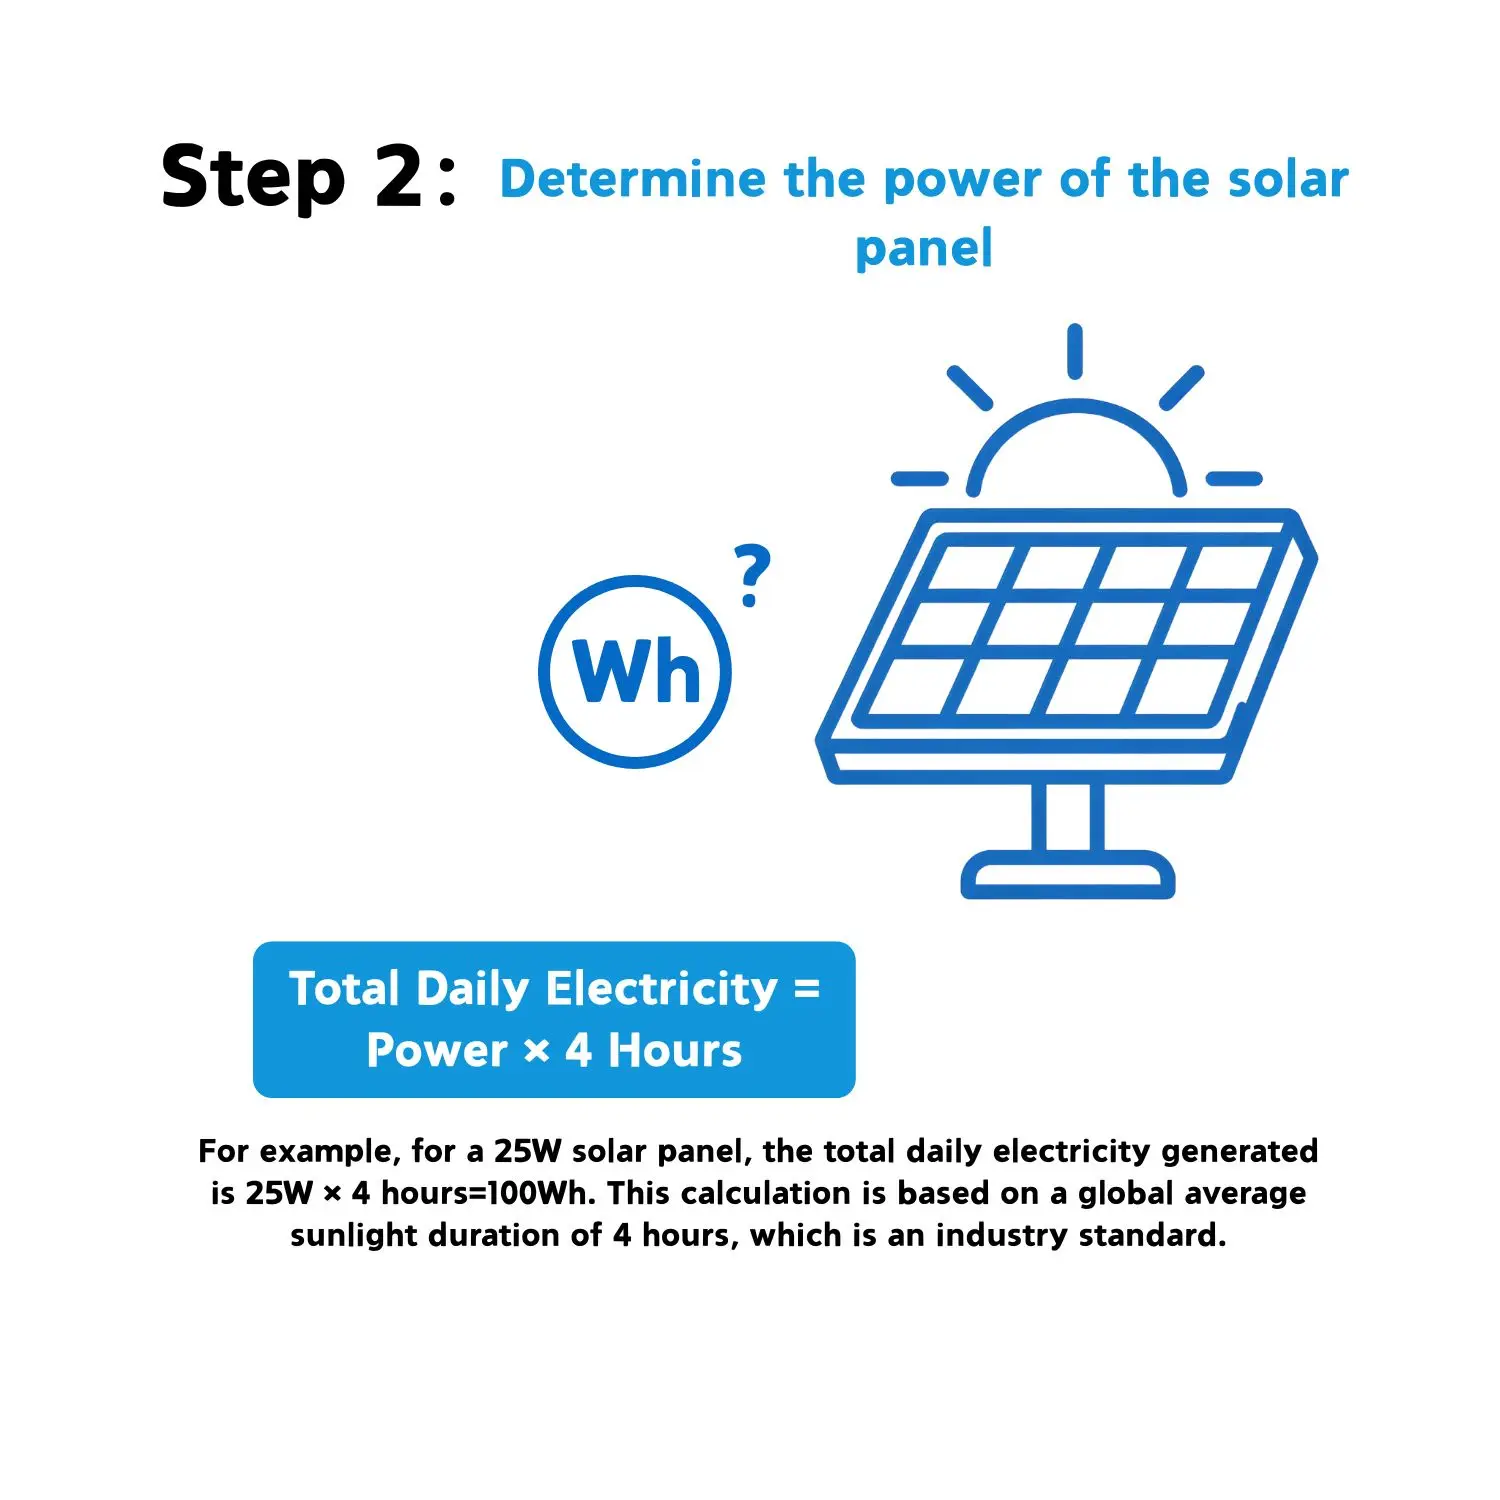
Step 2: Determine the Total Daily Power Generation of the Solar Panel
Total Daily Power Generation = Power of the Solar Panel × 4 Hours
For example, a 25W solar panel has a total daily power generation of 25W × 4 Hours = 100Wh. This calculation is based on the global average sunshine duration of 4 hours per day.
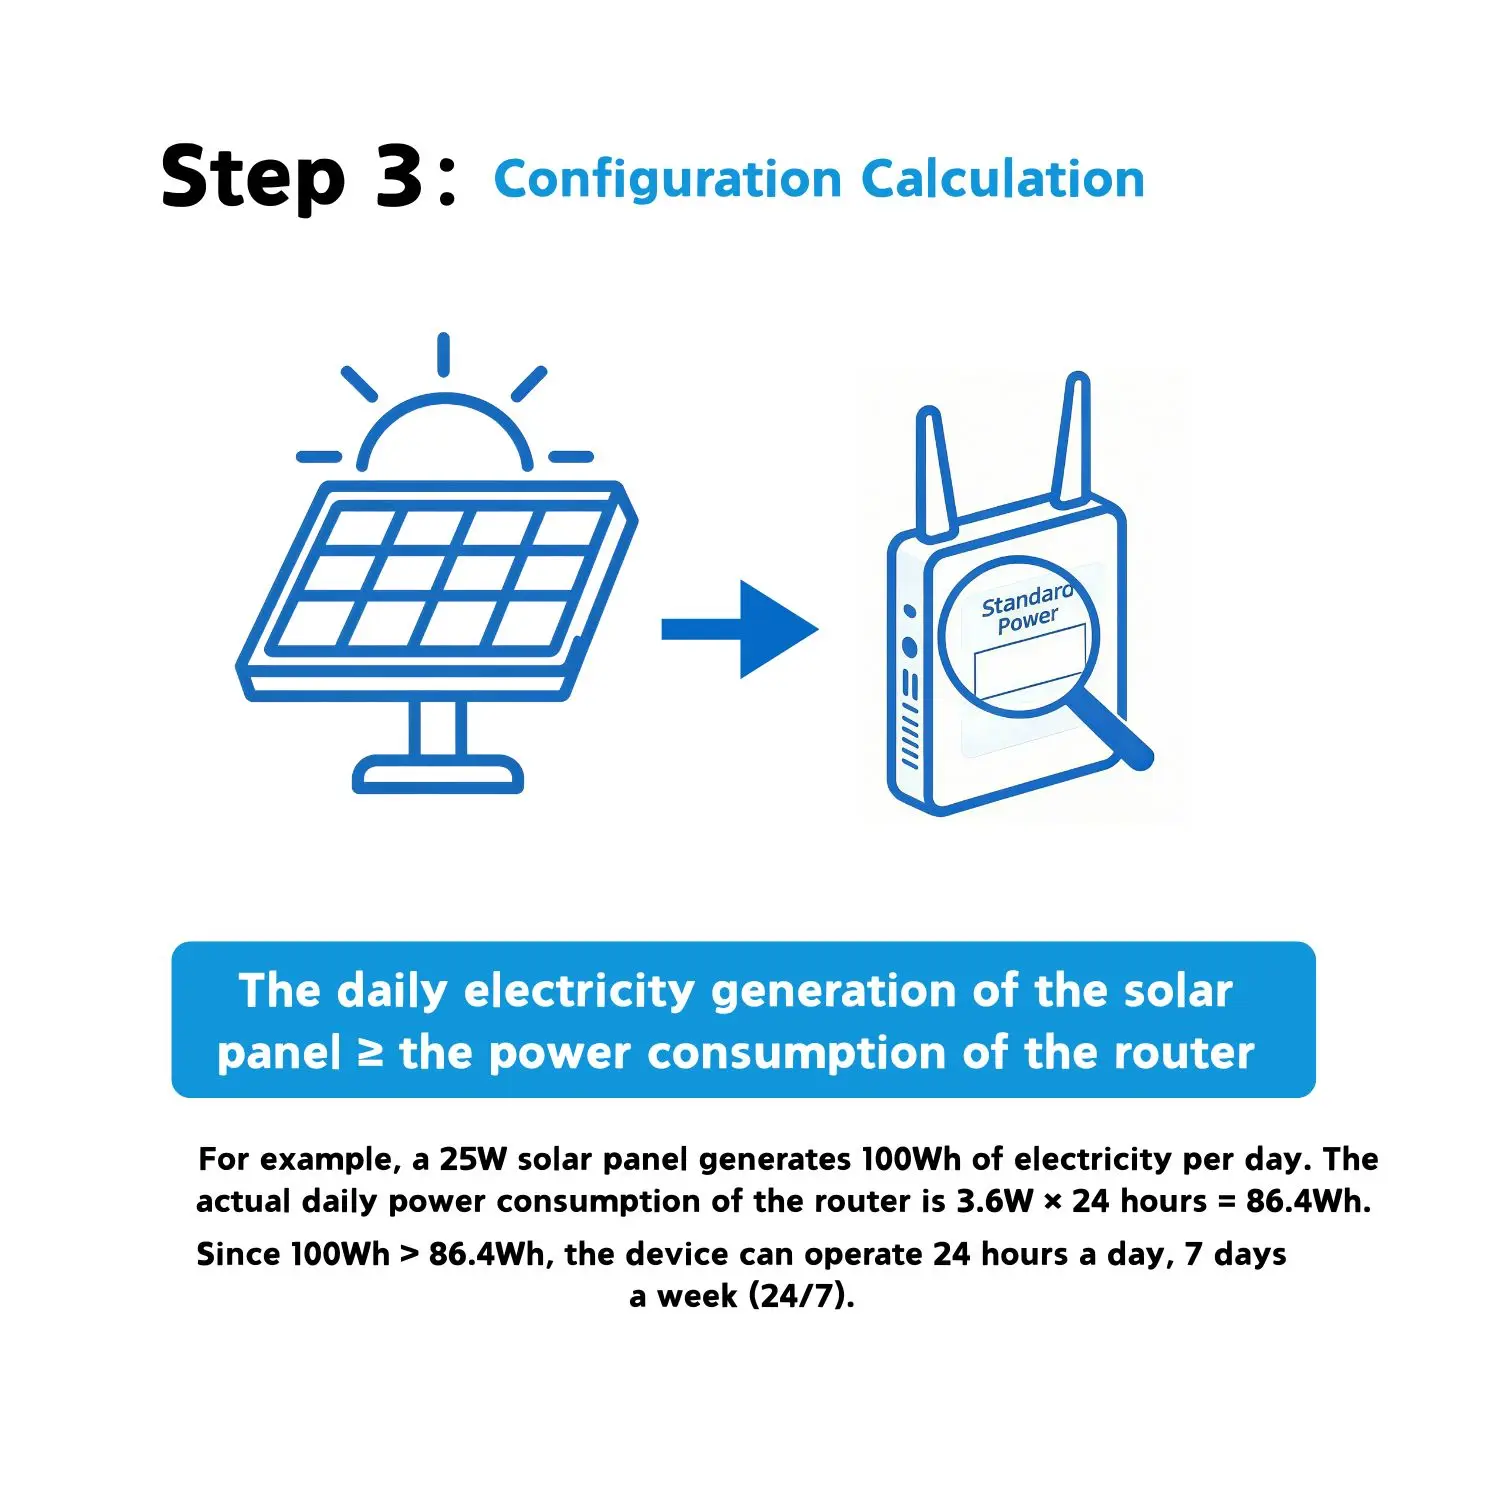
Step 3: Configuration Instructions
The total daily power generated by the solar panel must be greater than the total daily power consumed by your device.
For example, a 25W solar panel generates 100Wh of power per day. A router consumes 3.6W of power, so its total daily power consumption is 3.6W × 24 Hours = 86.4Wh. Since 100Wh > 86.4Wh, the solar panel can support the router to operate 24 hours a day, 7 days a week.
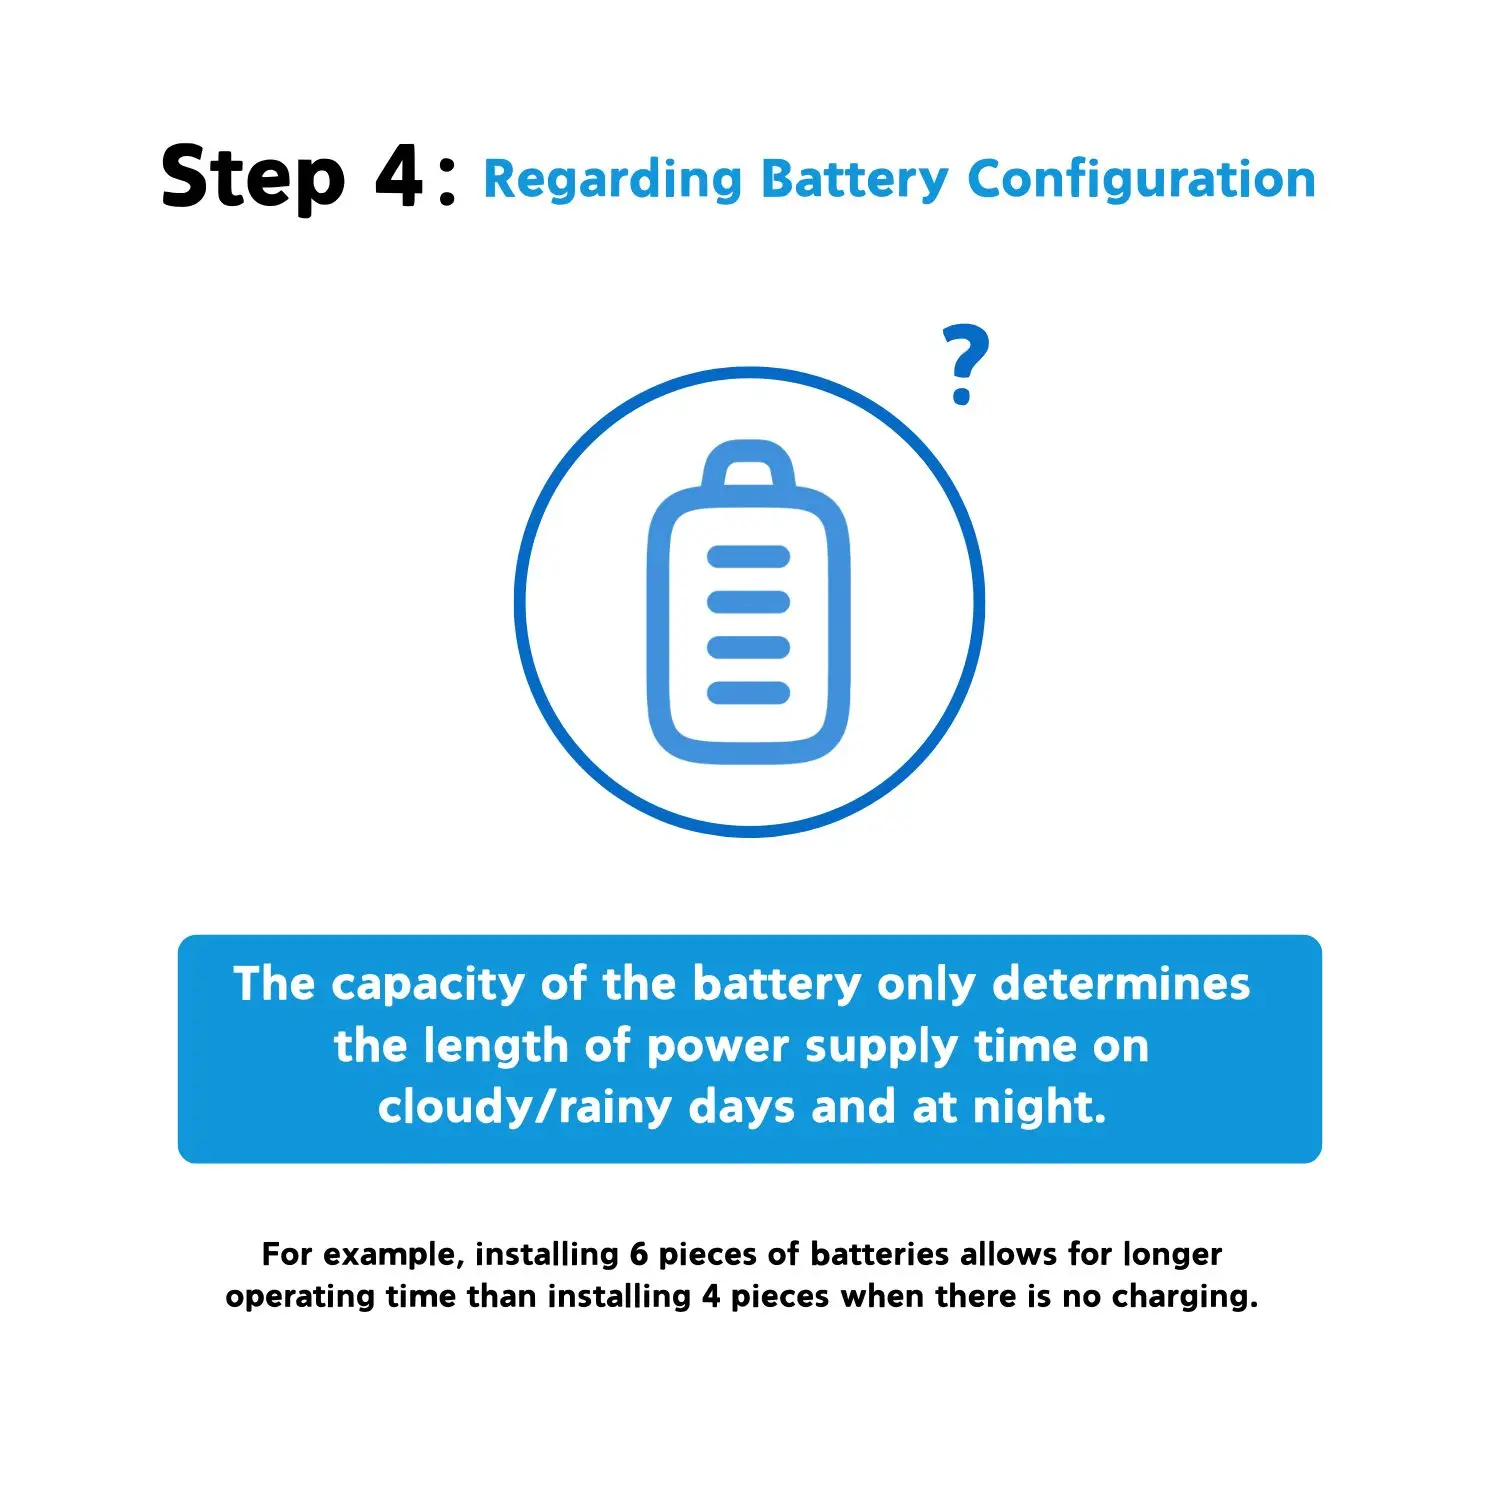
Step 4: Instructions on the Battery
The total capacity of the battery is only related to the operating duration of your device on cloudy/rainy days or at night.
For example, installing 6 pieces of batteries instead of 4 pieces will allow your device to operate for a longer period.
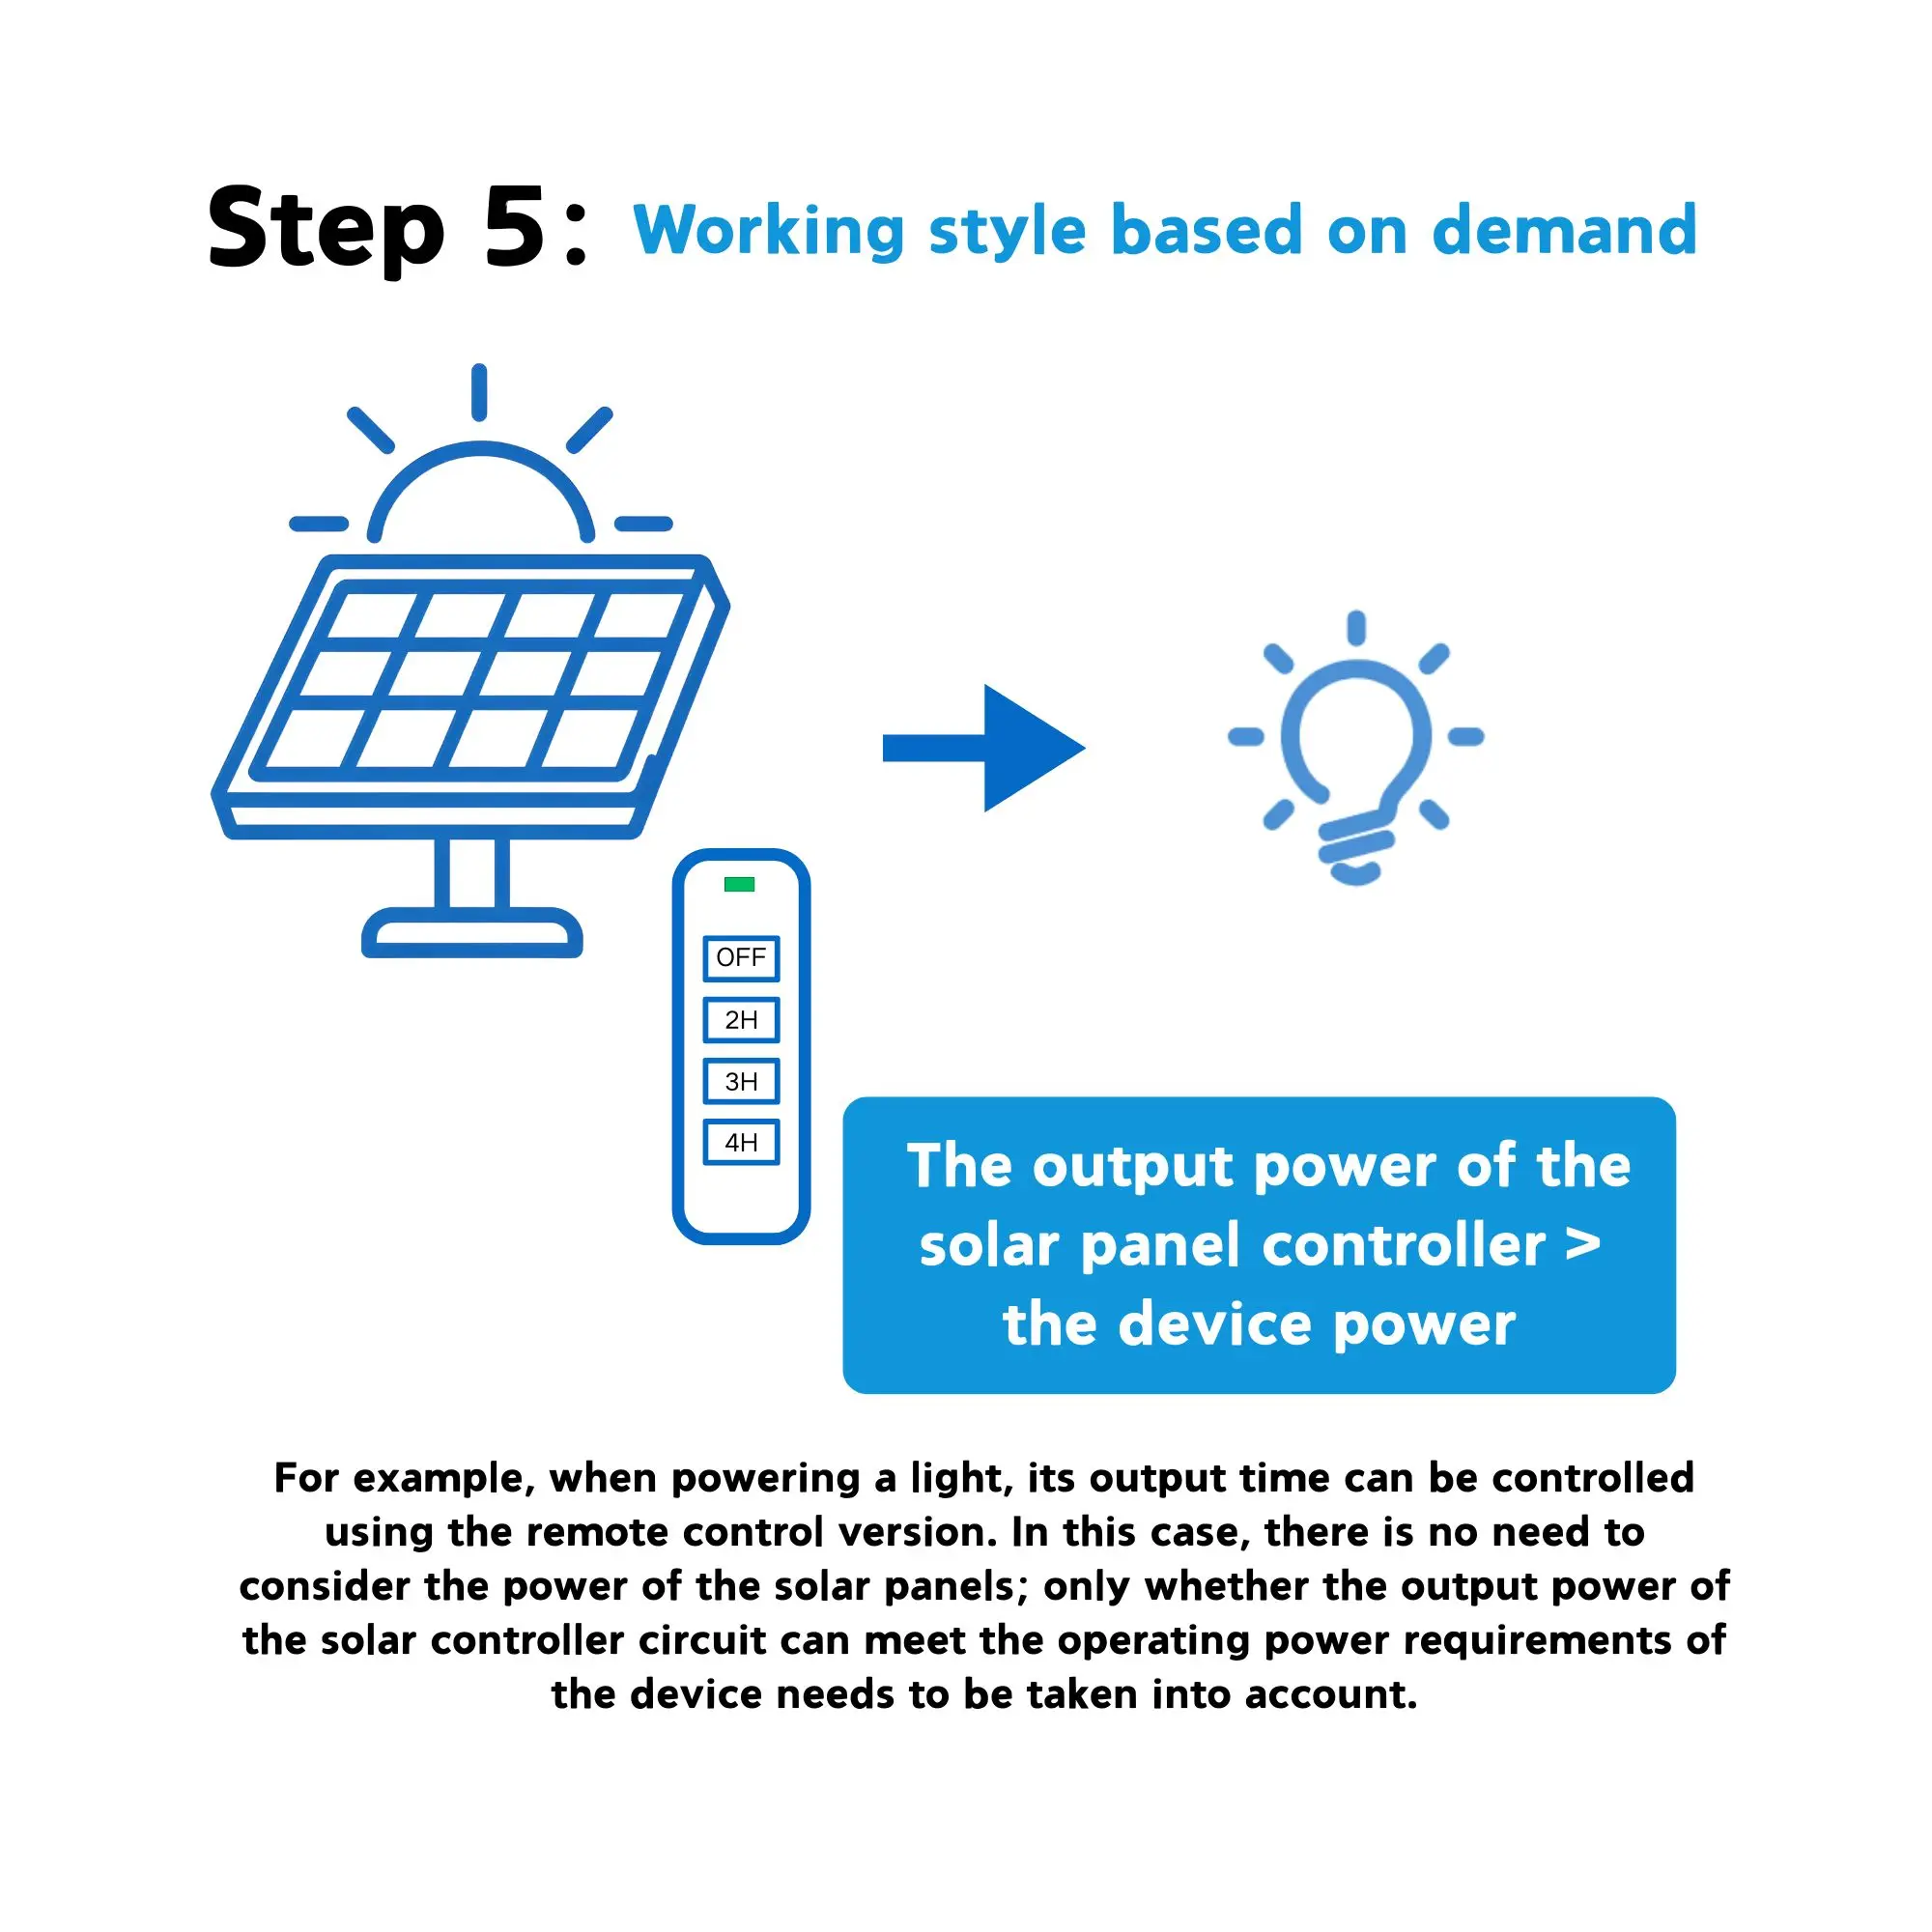
Step 5: Working style based on demand
For example, when powering a light, its output time can be controlled using the remote control version. In this case, there is no need to consider the power of the solar panels; only whether the output power of the solar controller circuit can meet the operating power requirements of the device needs to be taken into account.